What is HuskyLens? HuskyLens is a smart vision sensor developed by DFRobot. It integrates AI technology, making it capable of recognizing objects, faces, colors, and even gestures. With its compact size and ease of use, HuskyLens opens up a lot of possibilities for Arduino enthusiasts, from robotics to home automation and beyond.
Learning Faces: Follow section 7.1 on DFRobot website for details on how to learn Faces: https://wiki.dfrobot.com/HUSKYLENS_V1.0_SKU_SEN0305_SEN0336
Prerequisites: Before diving into using HuskyLens with Arduino Uno, ensure you have the following:
Arduino Uno board
HuskyLens
Micro USB cable
Arduino IDE installed on your computer
Basic knowledge of Arduino programming
HuskyLens Library https://codeload.github.com/HuskyLens/HUSKYLENSArduino/zip/master
Connecting HuskyLens to Arduino Uno:
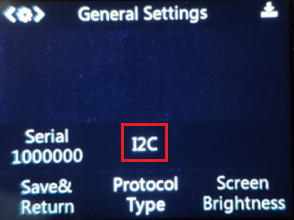
There are two ways to wire HuskyLens with Arduino - Using SoftwareSerial or using I2C communication protocol. We will be using I2C - make sure to set it correctly in HuskyLens Settings.

Now, let's establish the connection between HuskyLens and Arduino Uno using the I2C protocol.
Connect the HuskyLens to Arduino Uno (follow the image below):
VCC to 5V
GND to GND
SDA to A4
SCL to A5

Arduino Sketch
#include "HUSKYLENS.h"

HUSKYLENS huskylens;
//HUSKYLENS green line >> SDA; blue line >> SCL
void printResult(HUSKYLENSResult result);

void setup() {
    Serial.begin(115200);
    Wire.begin();
    while (!huskylens.begin(Wire))
    {
        Serial.println(F("Begin failed! Please check connections"));
        delay(100);
    }
}

void loop() {
    if (!huskylens.request()) {
		Serial.println(F("Fail to get data from HUSKYLENS"));
    } else if(!huskylens.isLearned()) {
		Serial.println(F("Nothing learned"));
    } else {
        while (huskylens.available())
        {
            HUSKYLENSResult result = huskylens.read();
            if (result.ID != 0) {
              	printResult(result);
            }
        }
    }
}

void printResult(HUSKYLENSResult result){
    if (result.command == COMMAND_RETURN_BLOCK){
		Serial.println(String() + F("Block:xCenter=") + result.xCenter + F(",yCenter=") + result.yCenter + F(",width=") + result.width + F(",height=") + result.height + F(",ID=") + result.ID);
    }
    else if (result.command == COMMAND_RETURN_ARROW){
        Serial.println(String() + F("Arrow:xOrigin=") + result.xOrigin + F(",yOrigin=") + result.yOrigin + F(",xTarget=") + result.xTarget + F(",yTarget=") + result.yTarget + F(",ID=")+result.ID);
    }
    else{
        Serial.println("Object unknown!");
    }
}
Detecting a face

HUSKYLENSResult result object contains the ID of the detected face along with it's coordinates and box size. Huskylens follows following Cartesian coordinate system, with (0,0) being the top-left.

Now that you are able to connect Huskylens to Arduino, you can use it for Face Detection, Object Detection, Object Tracking, Line Tracking, Color Detection and AprilTag Detection.